Adding Time to my Blog's Statistics

Recently I added some statistics to my blog. I wanted to do that with minimum effort and without serving any crappy proprietary JavaScript to my users.
Challenge #100DaysToOffload No. 11
My blog is powered by WriteFreely, a free software written in Go. They already include a counter of views per page of my blog. This is nice, you can see the numbers in your admin interface so you can see which page works better than the others.
The thing is, you don't have any notion of time. You can't differentiate a post which has made 1000 views in 3 days from another which has made 1000 views in 2 months.
As I said, I wanted to fix that with minimum effort and have some nice graphs. I already have:
- InfluxDB and Grafana on my Raspberry Pi
- InfluxDB is a time series database, meaning it's optimized to store series of data or events which occurred at a given time. Seems perfect for my blog analytics: I could regularly store the current view count of all posts and observe the evolution.
- Grafana is basically a service that draws graphs in a browser based on data from time series databases (and many other things, but that's my use case here). With that, I can graph the evolution of my view counts.
- The data on my blog server (not my Raspberry Pi), just waiting to be pushed
Based on this inventory, I assumed I needed at least one thing, maybe two:
- (mandatory) A script to retrieve the data from WriteFreely's database and push it to my Raspberry Pi
- (not mandatory) A service to receive the data, parse it and send it to InfluxDB. I say it's not mandatory because I could allow my blog server to push directly to InfluxDB, but I don't want that since it also exposes the existing data to a potential attacker.
I ended up writing both of these, in one hour and a half using SQLite, cURL, Python and Flask.
Retrieving
My blog data is stored in an SQLite database on my server, which makes the access very easy. A simple one-liner exports the data I'm interested in to CSV:
sqlite3 /srv/writefreely/writefreely.db ".mode csv" ".header on" "select id, slug, view_count, title from posts order by view_count desc;"
Let's quickly review all these parts:
sqlite3 /srv/writefreely/writefreely.db: connect to the database. All strings enclosed in quotes after this part are commands sent to SQLite.".mode csv": render data as CSV".header on": add column names to the CSV, useful if I later change the order of the columns"select id, slug, view_count, title from posts order by view_count desc;": This is the SQL query I use to retrieve the view counts from my database. Of course this might break if WriteFreely changes their data schema but I'll try to carefully read the changelog. Anyway, this retrieves the id, the slug, the view count and the title of all posts, sorted by view count from the biggest to the smallest. The slug is basically the URL of the post, the id is a unique identifier for the post and the other fields are pretty self explanatory.
This command gives the following output:
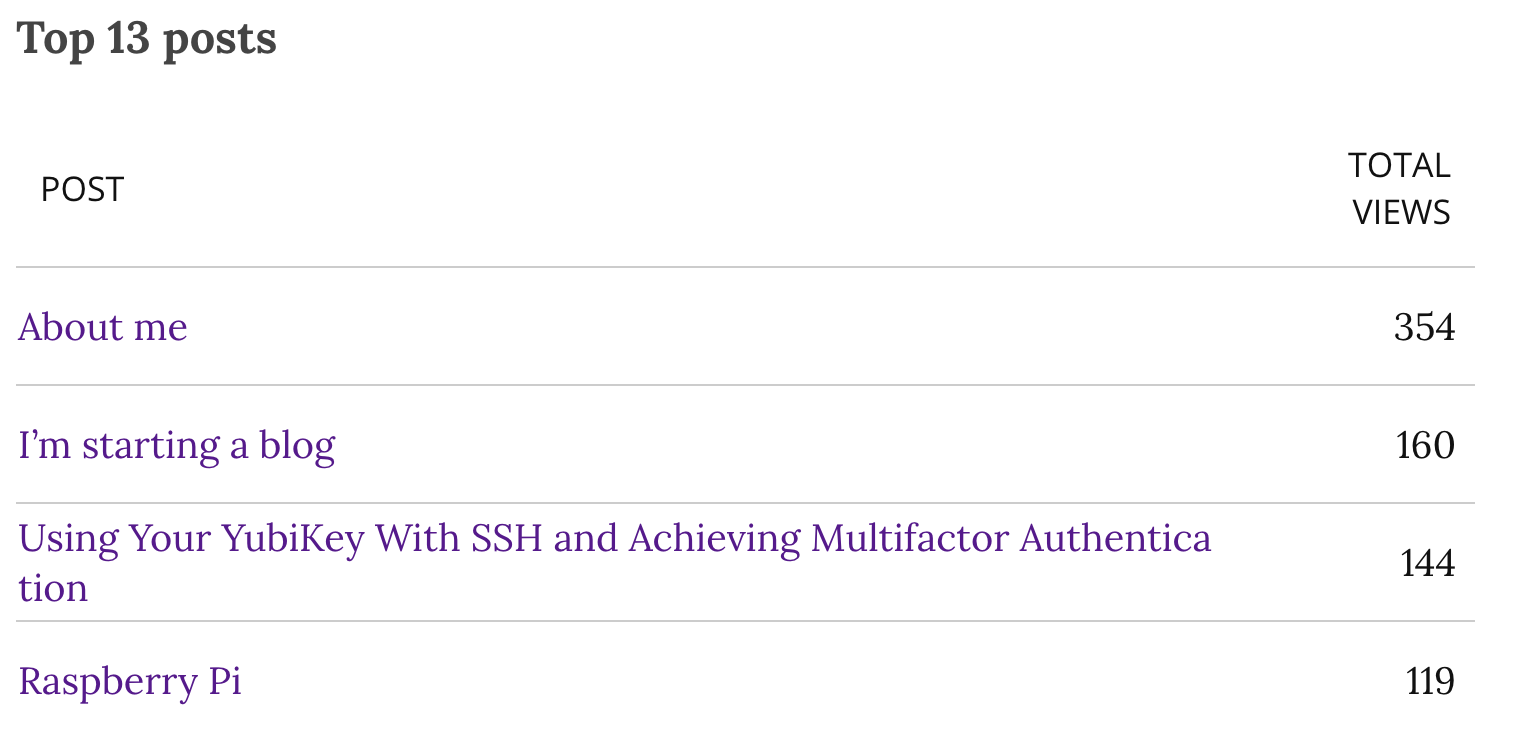
$ sqlite3 /srv/writefreely/writefreely.db ".mode csv" ".header on" "select id, slug, view_count, title from posts order by view_count desc;"
id,slug,view_count,title
i3js9560vz,about-me,354,"About me"
ljp31nabom,im-starting-a-blog,160,"I'm starting a blog"
vf28dd7qao,using-your-yubikey-with-ssh-and-achieving-multifactor-authentication,144,"Using Your YubiKey With SSH and Achieving Multifactor Authentication"
vvci3b8p7d,raspberry-pi,119,"Raspberry Pi"
7326h2oj6s,synology-nas-stream-and-backup,109,"Synology NAS: Stream & Backup"
epkzgogx3q,my-setup-at-home,106,"My Setup at Home"
khojwbz2yv,youtube-on-apple-tv,70,"YouTube on Apple TV"
fdqlkla5qk,codingame-spring-challenge-2020-pacman,68,"CodinGame Spring Challenge 2020 - Pacman"
7x01zg6f0y,how-to-subscribe,65,"How to subscribe"
p3yf5p51rv,upgraded-writefreely-quick-note,62,"Upgraded writefreely - Quick Note"
bag5783dgc,bitwarden-and-password-managers,61,"Bitwarden and Password Managers"
3r1su2zj2q,cleantoots-clean-your-toot-history,39,"Cleantoots - Clean Your Toot History"
0cowcmcwur,pi-hole,36,"Pi Hole"
Now, I need to send this data to my server. Since I already decided I didn't want to expose the InfluxDB but only a small app that only accepts this data, I decided not to transform the data on the blog server. I would parse it on the Raspberry Pi after receiving it.
Sending
curl is the perfect tool to make HTTP requests on the command line. I wanted to make a POST request with the output of the previous command as the body.
After some research and a lot of trial and error, here's what I came up with:
curl -X POST -H "Content-Type: text/csv" -m 30 --data-binary @- "http://<ip>:<port>/stats"
This expects data on the standard input, so I have to pipe the two commands:
sqlite3 /srv/writefreely/writefreely.db ".mode csv" ".header on" "select id, slug, view_count, title from posts order by view_count desc;" | curl -X POST -H "Content-Type: text/csv" -m 30 --data-binary @- "http://<ip>:<port>/stats"
Again, some explanation:
curl -X POST: make a POST request-H "Content-Type: text/csv: add a header explaining what I'm sending-m 30: use a sensible timeout in case my Raspberry Pi doesn't respond--data-binary @-: read data from stdin and send it as the body of the request"http://<ip>:<port>/stats": the endpoint where to send the data
I just needed to add this to my crontab to run this periodically. I originally chose a resolution of 10 minutes but found myself needing more data quickly, so I changed it to 1 minute. This also makes the loss of a data point less harmful.
At this point, we have a working script to read my blog stats and send it to my Raspberry Pi. Now we need to be able to receive it.
Receiving
The code for this part is free software, you can find it on my Gitea. The meat of this is a small Python Flask app:
from flask import Flask, request
import csv
from io import StringIO
from influxdb import InfluxDBClient
import datetime
import os


INFLUX_USER = os.getenv("INFLUX_USER")
INFLUX_PASSWORD = os.getenv("INFLUX_PASSWORD")
INFLUX_DB = os.getenv("INFLUX_DB")

app = Flask(__name__)

@app.route("/stats", methods=["POST"])
def hello_world():
    client = InfluxDBClient('localhost', 8086, INFLUX_USER, INFLUX_PASSWORD, INFLUX_DB)
    influx_data = []
    time = datetime.datetime.now().astimezone().isoformat()

    data = request.data.decode("utf-8").split("\r\n")
    reader = csv.DictReader(data, delimiter=",", quotechar='"')
    for line in reader:
        try:
            view_count = int(line["view_count"])
            id_ = line["id"]
            slug = line["slug"]
            title = line["title"]
        except (ValueError, KeyError):
            continue

        influx_data.append({
            "measurement": "blog_stats",
            "time": time,
            "tags": {
                "id": id_,
                "slug": slug,
                "title": title
            },
            "fields": {
                "value": view_count
            }
        })

    if influx_data:
        client.write_points(influx_data)
        return "written"
    return "nothing to write"
It expects data to be sent on its /stats endpoint as a POST request, which we did earlier. It then parses the body of the request as CSV, constructs an object to send to influx db and sends it. That's all!
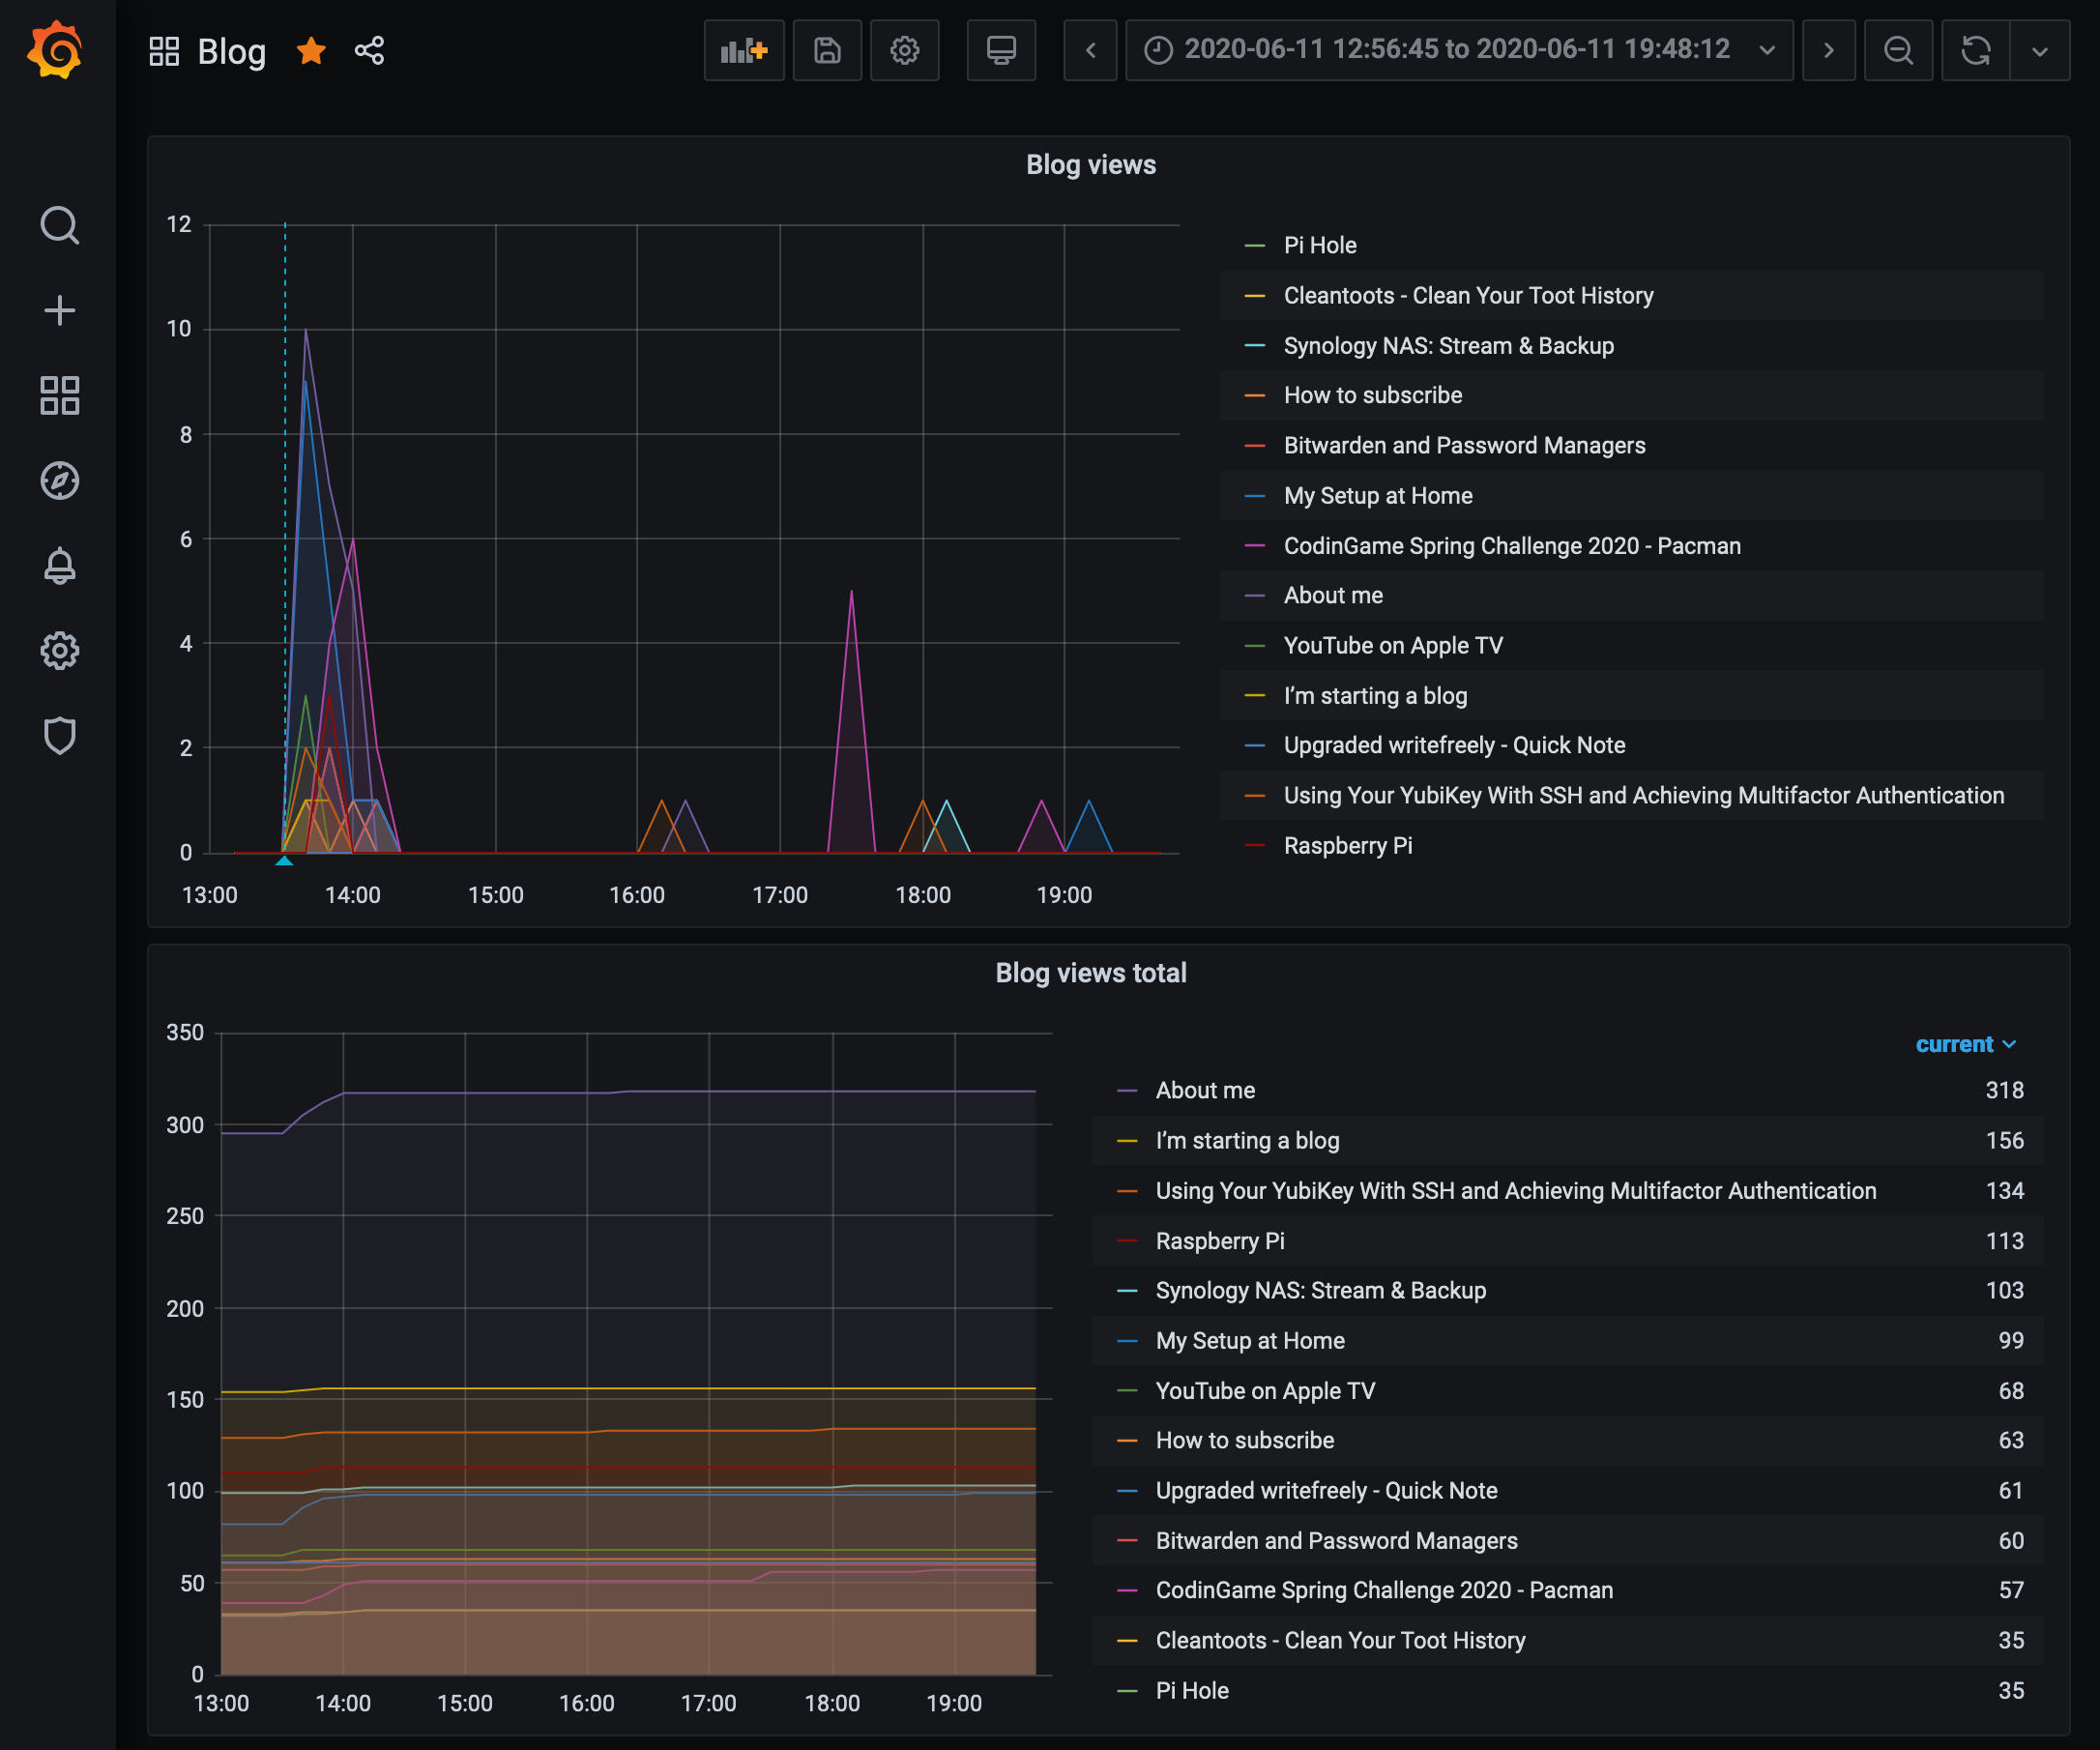
Graphing
I made two panels on my Grafana dashboard: one to view the raw view counts evolving, the other to display the difference between two data points. That is: the number of views in one minute.
Here are the two graphs in action:
Allowing communication between devices
Lastly, I needed to enable the communication between the two devices. My Raspberry Pi is protected with ufw (which stands for Uncomplicated FireWall) in which I only allow access to ports I need from the IP addresses I need:
ufw allow in proto tcp from 10.64.168.93/32 to any port <PORT> comment "Blog stats"
ufw allow in proto tcp from 2001:bc8:47a8:42e::1/128 to any port <PORT> comment "Blog stats"
Limitations
This only counts page displays, doesn't discriminate unique visitors, web crawlers, etc. It excludes logged in users however (me, in that case). It's more than enough for what I need, I don't need to know from which country or how old are my visitors.